| |
Import & animate Poser figures in Strata - step by step |
Tutorial step by step to export figures and animations from Poser, to import in Strata CX. The tutorial explains a way of doing it, but possibly there exist other ways of being able to realize this.
I am lookin for the way of simplifying someone of the steps, and especially to find a more exact way of fitting the size of the figure to the size of the Skeleton. Since I am not an expert in figures animation, I have still some doubts that to solve. I expect to be able to update this tutorial with some improvement soon.
* The possibility of importing BVH files with the version CX 5.1 only is available for the present time for Strata Betatesters.
Xavier Mestres |
| POSER: 1 - Create figure in Poser (I assume that the user has Poser's knowledge).
Launch Poser (I use Poser 7, but you can use other version). Create a new figure (I use SidneyG2 with some clothes). Reset pose - (Figure/Reset/Reset pose). Save the file (example name: "SidneyG2-ResetPose.pz3).
|
|
| 2 - Export figure. OBJ or COLLADA file |
 |
|
|
Then export the figure to OBJ or COLLADA file (dae)
I use OBJ for this tutorial.
OBJ creates a file with a unique textured mesh. COLLADA exports every part of the figure as a separated mesh.
For animation purposes I recommend use OBJ. |
| 3 - Import BVH file in Poser |
 |
|
You can create an animation in Poser, or import a motion file (BVH motion). I prefer using BVH files with real motion captured*. You can directly import the BVH file to Strata CX5.1, but if you do it across Poser, it allows change the first frame of the animation to Reset pose.
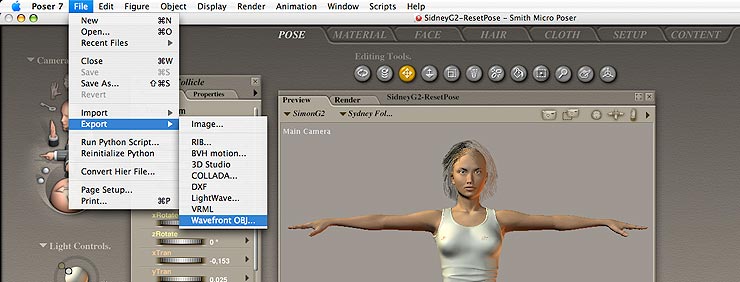
Select your figure in Poser (SidneyG2/Body). File / Import / BVH motion.
4 - Modify first key frame.
Open Key Frame window. Go to frame 1 of the Body Layer. Reset pose (Figure/Reset/Reset pose).
5 - Export motion.
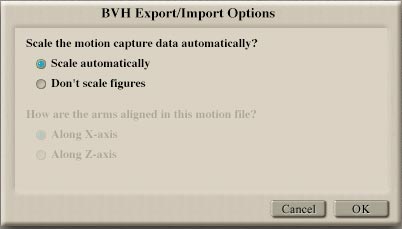
File / Export / BVH motion. Select "Scale automatically."
* You can find a royalty free BVH files in internet. |

|
| 6 - Import BVH file in Strata CX 5.1 & Save |
 |
|
|
The possibility of importing BVH files with CX 5.1 only is available for the present time for Betatesters.
Launch Strata CX 5.1. (CX 5.1 can import BVH files) Create new document (File/new).
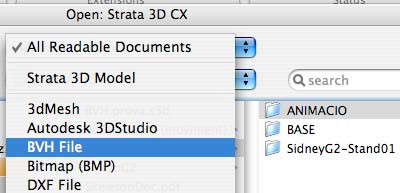
Import BVH file (File/Import/BVH File).
Selects the BVH file exported previously from Poser.
|
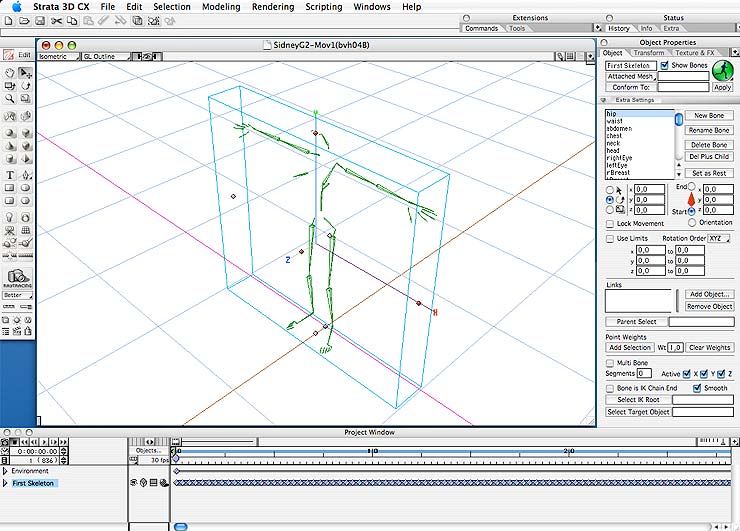
Now, we have the motion capture in Strata.
To verify that the animation works correctly, open the Project Window. In the objects list, there appears an object called "First Skeleton" in the timeline there are key frames of the animation.
Move the total time slider of animation up to the last key frame. Play. The object with bones starts moving.
1  2 |
Save the file in ".s3d" format, and Quit CX5.1 |
|
| 7 - Create new document and import figure |
Launch Strata CX5.5 or 6.0.
Create a new document (File/New).
Import the OBJ file with figure previously exported from Poser. (File/Import/Obj) |
|
|
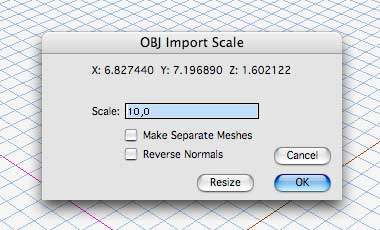
On importing the OBJ file, a dialog box (OBJ Import Scale) appears where we can define the scale of import from the original file.
Default Scale is "1". The scale size is not important in this case, since later we will have to scale the object to fit it with the bones, but I have enlarged it to 100 so it is not too small and difficult to handle.
Nevertheless, in order that the imported object is not very small and difficult to handle, we can scale 10. |
 |
8 - Open the file in CX 5.5 or higher.
Now, open the previously saved skeleton file (from CX5.1) with the BVH motion. |
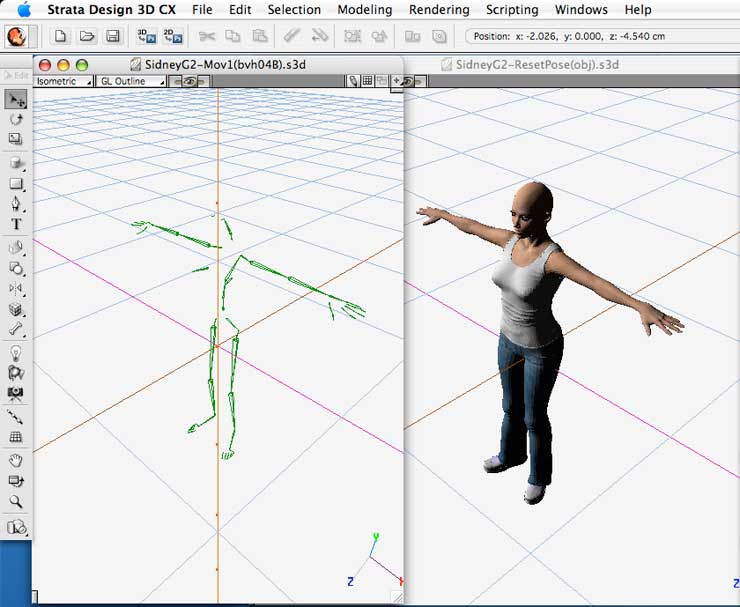 |
| 9 - Copy & Paste Skeleton with animation |
Select the "Skeleton" and copy. Paste into the figure file.
Be sure that you copy the object Skeleton, not the shape that contains it.
 |
a  |
 |
With skeleton selected, in Object Properties, chose "Move to Reset Pose".
Move the skeleton to Reset Pose (0,0,0 in world coordinates).
Now is ready to join with the mesh figure. |
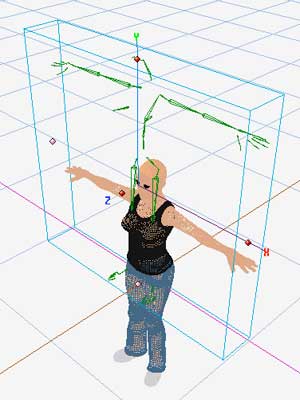
| 10 - Join figure to Skeleton |
|
Now scale the figure up to fit to the size of the skeleton and then move the figure onto the skeleton. This one is the most laborious part of the process, due to the fact that if the sizes do not match well and the position of both is not the same, we will have poor results when joining both elements.
But this is a visual adjust.
Once scaled, we have to recenter the origin point of the figure, then from "Object properties" move to 0,0,0.
(see image)
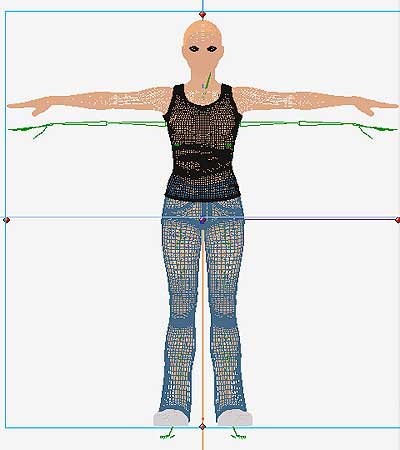
Now, with "command" key pressed (mac), move the figure down to match the Skeleton without moving the origin center.
Change to left view, and do the same operation, moving the figure (left or right) to adjust in the Z axis without moving origin center.
Possibly there is a more exact way of realizing this process. I will continue investigate and try to improve this part of the tutorial. |
 |
When the figure and the skeleton are perfectly aligned, we must join them to allow the figure to follow the animation of the Skeleton. |
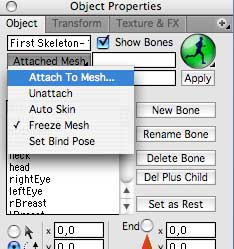 |
Attach To Mesh.
We select the skeleton and the object properties palette changes. In the drop-down menu I select "Attach to Mesh".
This opens a dialog box that shows us the list of "meshes" available to join. Selects the figure mesh, and click OK. The skeleton connects to a polymesh object.
Now we have the mesh joined the skeleton, but the mesh does not follow the animation. We need to do two more steps.
"Freeze Mesh" must be activated always. |

|
Set Bind Pose
The following step is to fix "Set Bind Poses".
This sets the current pose as the "bind" or zero deformation pose of the skeleton. You would normally use this by rotating the bones of the skeleton in the desired position to align it with your mesh.
|
 |
Auto Skin
This is a automatic smooth skinning function that will connect all points of the mesh to one or two bones by weights. If the points are near a joint, it calculates to appropriate percent for each bone. The closest two bones effect a point.
Now the animation is completed. To quickly check that it works correctly, we can move the slider of the timeline up to frame 100 for example, and see if the figure follows the movement of the skeleton.
If you have preformed the steps correctly, the mesh will follow the skeleton movements. In case the placement of the mesh with regard to the skeleton was not totally correct, the animation will execute but the mesh will not follow the skeleton correctly. (See the following animation, where this happens.)
|
|
*Free BVH file Links:
http://www.sharecg.com/pf/full_uploads.php?pf_user_name=mojodallas
http://www.animazoo.com/Free_downloads.aspx
http://freemotionfiles.blogspot.com/search/label/BVH |
|